Battery switch on travel trailer function is crucial for managing your RV’s power. Understanding how these switches work – whether single-pole, double-pole, or double-pole double-throw – is key to safe and efficient power management. This guide will walk you through the different types, their connection and disconnection procedures, troubleshooting tips, and essential safety precautions. We’ll cover everything from integrating your battery switch with other electrical components like solar panels and inverters to preventing common problems like corrosion and blown fuses.
We’ll explore the ins and outs of your travel trailer’s battery system, empowering you to confidently handle its electrical needs. From correctly connecting your batteries and switching between banks to diagnosing and fixing issues, this guide will equip you with the knowledge to keep your RV running smoothly.
Troubleshooting Battery Switch Issues

Your travel trailer’s battery switch is a crucial component, controlling the flow of power between your house batteries and the truck’s charging system or shore power. Problems with this switch can leave you without power, so understanding how to troubleshoot and fix them is essential for any RV owner. This section will guide you through common issues, diagnostic steps, and switch replacement.
Common Battery Switch Problems, Battery switch on travel trailer function
Several issues can arise with your travel trailer’s battery switch. These often manifest as a complete lack of power to the trailer’s systems, inconsistent power, or the inability to charge your house batteries. The most frequent culprits are blown fuses, corroded terminals, and a faulty switch itself. Sometimes, a seemingly simple problem like a loose connection can mimic a more serious issue.
Therefore, a systematic approach to troubleshooting is vital.
So, you’re an audiophile who travels? Awesome! Check out this guide on setting up your audiophile travel setup for amazing sound on the go. It’s all about packing smart and prioritizing quality. And don’t forget to sort out your travel insurance beforehand; getting Aon travel insurance is a good idea for peace of mind, protecting your gear and your trip.
Remember to compare policies to find the best coverage for your needs!
Troubleshooting Steps for Battery Switch Problems
Before you start replacing parts, systematically check the following:
- Check the Fuses: Inspect all fuses associated with the battery switch and the charging system. Look for blown fuses (broken filaments). Replace any blown fuses with fuses of the correct amperage rating. Failing to do so can cause further damage. Remember to always disconnect the negative battery terminal before working with electrical components.
- Inspect the Terminals: Examine the battery terminals and the switch terminals for corrosion. Corrosion can impede current flow, leading to power issues. Clean any corrosion using a wire brush and baking soda paste. After cleaning, apply a dielectric grease to prevent future corrosion.
- Test the Switch: With the negative battery terminal disconnected, use a multimeter to test the continuity of the switch in different positions (e.g., battery to battery, battery to chassis). If the switch fails to show continuity in the expected positions, it indicates a faulty switch that needs replacement. Refer to your multimeter’s instructions for proper continuity testing.
- Check Connections: Ensure all wiring connections to the battery switch are secure and tight. Loose connections can cause intermittent power problems. Tighten any loose screws or bolts. If wires are damaged, they must be repaired or replaced.
Replacing a Faulty Battery Switch
Replacing the battery switch is usually straightforward, but it’s essential to follow safety procedures:
- Disconnect the Batteries: Disconnect the negative terminal from both the house batteries and the vehicle battery. This is crucial for safety to prevent electrical shocks.
- Remove the Old Switch: Carefully remove any screws or fasteners holding the old switch in place. Take note of the wiring configuration before disconnecting any wires. Take pictures if needed.
- Install the New Switch: Mount the new switch securely in the same location as the old switch. Ensure the switch is properly oriented.
- Reconnect the Wiring: Connect the wires to the new switch, ensuring they are connected to the correct terminals. Refer to the wiring diagram or the markings on the switch itself. Double-check your connections before proceeding.
- Reconnect the Batteries: Reconnect the negative terminals to both batteries. Check all trailer systems to verify proper functionality.
Troubleshooting Flowchart
A flowchart can simplify troubleshooting. Imagine a diamond shape representing a decision point (Yes/No), rectangles for actions, and ovals for start/end points.[Imagine a flowchart here. The flowchart would start with “Power Problem?”, branching to “Check Fuses,” then “Fuses Blown?” (Yes/No). If Yes, replace fuses and test. If No, it would branch to “Check Terminals,” then “Corrosion Present?” (Yes/No).
If Yes, clean terminals and test. If No, it would branch to “Test Switch,” then “Switch Faulty?” (Yes/No). If Yes, replace switch. If No, it would branch to “Check Connections,” then “Loose Connections?” (Yes/No). If Yes, tighten connections and test.
If No, it would lead to “Seek Professional Help.” The end point would be “Problem Solved?” (Yes/No). If No, repeat the process or seek professional help.]
So, you’re an audiophile who travels? Awesome! Check out this guide on building the perfect audiophile travel setup to keep your ears happy on the go. It’s crucial to protect your investment, though, so remember to sort out your travel insurance before you leave. Getting Aon travel insurance or a similar policy is a smart move to cover any mishaps with your precious gear.
Don’t forget to pack carefully!
Battery Switch and Electrical System Integration
Your travel trailer’s battery switch acts as the central control for your 12-volt DC power system. Understanding how it interacts with other components is key to efficient power management and preventing electrical problems. This section details the integration of the battery switch with various parts of your RV’s electrical system.The battery switch’s primary function is to manage the flow of power from your batteries to the rest of the electrical system.
It allows you to disconnect your house batteries from the rest of the system for safety or storage, and select which battery bank (if you have multiple) is powering your appliances. It’s a critical safety feature, preventing accidental drain on your batteries and protecting sensitive electronics.
Power Distribution and the Battery Switch
The battery switch sits at the heart of your trailer’s DC power distribution. Power flows from your batteries, through the switch, and then to various components. The switch acts as a gatekeeper, controlling which circuits receive power and preventing back-feeding from other devices to your batteries. This prevents accidental discharges and ensures efficient power usage.
Diagram of Electrical System Power Flow
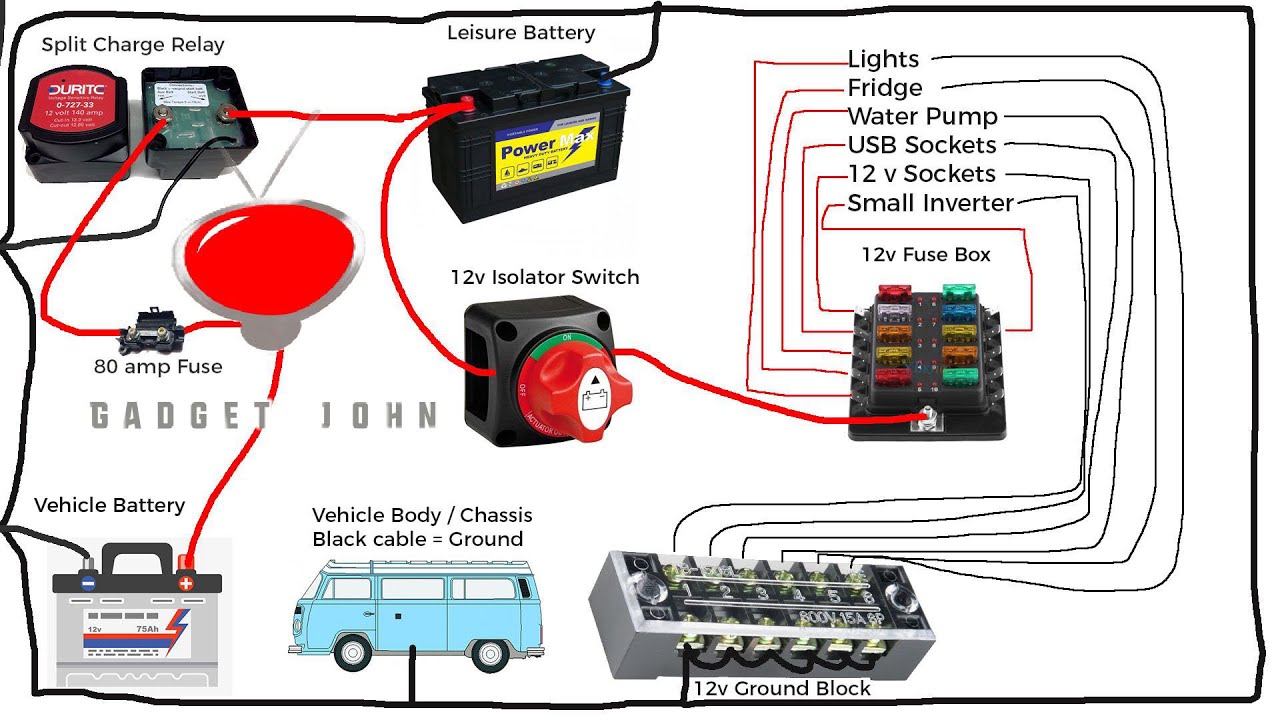
Imagine a simple diagram: Your batteries are represented by two circles labeled “Battery 1” and “Battery 2” (if applicable). From each battery, a wire leads to the battery switch, depicted as a square box with several outgoing lines representing different positions (e.g., “Off,” “Battery 1,” “Battery 2,” “Both”). From the switch, lines extend to other components: a converter (represented by a rectangle labeled “Converter”), an inverter (another rectangle labeled “Inverter”), and a group of smaller circles representing various 12V DC appliances and lights in your RV.
Solar panels, if installed, would also be connected, with a line leading to a charge controller (a small rectangle labeled “Charge Controller”) before finally connecting to the battery. Arrows on the lines indicate the direction of power flow. When the switch is in the “Off” position, all lines are disconnected. When the switch is in “Battery 1,” power flows only from Battery 1 to the connected components.
Similarly, “Battery 2” directs power only from Battery 2, and “Both” allows power from both batteries.
Electrical Components and Connections
Understanding the connection of your electrical components is crucial for troubleshooting and maintenance. Here’s a breakdown:
- Batteries: Provide the primary 12V DC power source for your RV. These are usually deep-cycle batteries designed for sustained discharge.
- Battery Switch: Controls the flow of power from the batteries to the rest of the system. It typically has multiple positions to select which battery or combination of batteries is active.
- Converter: Converts 12V DC power from your batteries into 120V AC power for household appliances. This is usually powered by your house batteries and may also charge them when plugged into shore power.
- Inverter: Converts 12V DC power from your batteries into 120V AC power, often for higher-power appliances. It usually draws a significant amount of current, so proper sizing is essential.
- Solar Panels (if installed): Generate DC power from sunlight, which is then regulated by a charge controller before being sent to your batteries for storage and use.
- Charge Controller (if installed): Regulates the charging current from your solar panels to prevent overcharging your batteries and extend their lifespan.
- 12V DC Appliances and Lights: These directly utilize the 12V DC power from your batteries, controlled by the battery switch.
Safety Precautions with Battery Switches: Battery Switch On Travel Trailer Function
Working with batteries and battery switches in your travel trailer involves potential hazards. Understanding and implementing proper safety precautions is crucial to prevent injury and damage. Ignoring these precautions can lead to serious consequences, including electric shock, burns, explosions, and even fire.
Improper use of battery switches can result in unintended electrical discharges, short circuits, and battery damage. This can be particularly dangerous in a confined space like a travel trailer. Preventative measures are essential to ensure the safe and reliable operation of your electrical system.
Personal Protective Equipment (PPE) Usage
Appropriate personal protective equipment is essential when working with batteries and electrical systems. This minimizes the risk of injury from potential hazards like acid spills, electrical shocks, and eye injuries. Always wear safety glasses or goggles to protect your eyes from splashes of battery acid or flying debris. Rubber gloves provide insulation against electrical shocks and protect your hands from corrosive battery acid.
Consider wearing long sleeves and pants to protect your skin from acid splashes. In case of larger battery banks or higher voltages, consider a face shield for added protection.
Preventing Electrical Shocks
Before working on any part of your trailer’s electrical system, always disconnect the negative (-) battery terminal. This breaks the circuit, preventing accidental shocks. Ensure that the battery switch is in the “OFF” position. When working with the battery switch itself, use insulated tools to avoid direct contact with metal parts. Never touch the terminals while the system is energized.
If you are unsure about any aspect of the work, consult a qualified electrician. Remember that even seemingly small voltages can cause painful shocks.
Preventing Battery Damage and Explosions
Avoid sparks or flames near batteries, as hydrogen gas released during charging can ignite explosively. Always ensure proper ventilation around batteries to prevent the buildup of flammable gases. Never allow metal tools or jewelry to fall onto the battery terminals. A short circuit can result in a dangerous surge of current, potentially causing damage to the battery or even an explosion.
When disconnecting the battery, disconnect the negative (-) terminal first and reconnect it last. This prevents potential sparks that could ignite flammable gases. Regularly inspect your batteries for signs of damage, such as corrosion or leaks. Replace damaged batteries promptly.
Working with the Battery Switch
When operating the battery switch, do so slowly and deliberately. Avoid forcing the switch, as this could damage the mechanism. Before turning the switch on or off, ensure all connected devices are in a safe and stable condition to prevent electrical surges. Regularly inspect the battery switch for signs of damage or corrosion. If you notice any issues, replace the switch immediately to avoid potential hazards.
Avoid using excessive force when operating the switch. A damaged switch can compromise the safety of the entire electrical system.
Mastering your travel trailer’s battery switch is a fundamental skill for any RVer. By understanding the different switch types, safe connection procedures, troubleshooting techniques, and essential safety precautions, you’ll be well-prepared to handle any power-related challenges on the road. Remember, proper maintenance and awareness of potential issues will ensure a safe and enjoyable camping experience. So, get out there and explore, knowing you’ve got your power situation under control!
FAQ Section
What size fuses should I use with my battery switch?
The appropriate fuse size depends on the amperage rating of your battery and wiring. Consult your RV’s electrical system diagram or a qualified electrician to determine the correct size.
How often should I inspect my battery switch and connections?
Regularly inspect your battery switch and connections, at least every three months or before each trip, for corrosion, loose connections, and damage. Clean and tighten connections as needed.
Can I use a battery switch to connect different battery voltages?
No. Never connect batteries of different voltages using a single switch. This can lead to damage to your batteries and electrical system.
What should I do if my battery switch gets hot?
A hot battery switch indicates a problem, likely a high current draw or a short circuit. Turn off the switch immediately, disconnect the batteries, and consult a qualified technician before further use.
